이번에 새로 출시된 Oracle Database 19c를 테스트 하기 위해 설치 과정을 정리 해본다.
1. 준비사항
-
VM : VMWare Fusion 11
-
VM사양 : 4Core 8GB, 20GB(Boot), 20GB(DB Data)
-
OS : Oracle Linux 7.6
2. Host 설정
- 파티션 설정
mkdir /u01

fdisk /dev/sdb

mkfs.ext4 /dev/sdb1

mount /dev/sdb1 /u01

필요 시 fstab에 해당 마운트된 볼륨을 넣어준다. (재부팅 시 auto mount)- 기본 패키지 및 계정 설정
yum install -y oracle-database-preinstall-19c.x86_64

passwd oracle

chown -R oracle:oinstall /u01

su - oracle

mkdir -p /u01/app/oracle/product/19.3.0/dbhome_1
3. DB 설치
- download oracle db 19c (zip파일로 된 파일을 다운받는다)
- Install 과정은 zip파일을 압축을 풀고, 아래 db_install.rsp를 실행하면 된다.
su - oracle

cd /u01/app/oracle/product/19.3.0/dbhome_1/

unzip /u01/LINUX.X64_193000_db_home.zip

cd /u01/app/oracle/product/19.3.0/dbhome_1/install/response/

cp db_install.rsp db_install.rsp.bak
- db_install.rsp을 설정에 맞게 수정한다. 아래는 수정한 부분만 정리한 것이다.
oracle.install.option=INSTALL_DB_SWONLY

UNIX_GROUP_NAME=oinstall

ORACLE_HOME=/u01/app/oracle/product/19.3.0/dbhome_1

ORACLE_BASE=/u01/app/oracle

oracle.install.db.InstallEdition=EE

PRIVILEGED OPERATING SYSTEM GROUPS는 모두 dba로 설정했다.
- db설치
/u01/app/oracle/product/19.3.0/dbhome_1/runInstaller -ignorePrereq -silent -responseFile /u01/app/oracle/product/19.3.0/dbhome_1/install/response/db_install.rsp
정상적으로 설치가 되면 아래와 같이 로그를 볼 수 있다.
====================== log ======================
Launching Oracle Database Setup Wizard...
[WARNING] [INS-13014] Target environment does not meet some optional requirements.
CAUSE: Some of the optional prerequisites are not met. See logs for details. installActions2019-05-22_03-41-24AM.log
ACTION: Identify the list of failed prerequisite checks from the log: installActions2019-05-22_03-41-24AM.log. Then either from the log file or from installation manual find the appropriate configuration to meet the prerequisites and fix it manually.
The response file for this session can be found at:
/u01/app/oracle/product/19.3.0/dbhome_1/install/response/db_2019-05-22_03-41-24AM.rsp
You can find the log of this install session at:
/tmp/InstallActions2019-05-22_03-41-24AM/installActions2019-05-22_03-41-24AM.log
As a root user, execute the following script(s):
1. /u01/app/oraInventory/orainstRoot.sh
2. /u01/app/oracle/product/19.3.0/dbhome_1/root.sh
Execute /u01/app/oraInventory/orainstRoot.sh on the following nodes:
[localhost]
Execute /u01/app/oracle/product/19.3.0/dbhome_1/root.sh on the following nodes:
[localhost]
Successfully Setup Software with warning(s).
Moved the install session logs to:
/u01/app/oraInventory/logs/InstallActions2019-05-22_03-41-24AM
================================================================
- 다시 root유저로 들어가서 위에서 나온 두개의 shell script를 수행한다.
exit

/u01/app/oraInventory/orainstRoot.sh

/u01/app/oracle/product/19.3.0/dbhome_1/root.sh
- 환경변수 설정을 bash_profile에 설정한다.
su - oracle

== edit bash_profile ==

# User specific environment and startup programs

export ORACLE_HOSTNAME=<호스트네임>

export ORACLE_BASE=/u01/app/oracle

export ORACLE_HOME=/u01/app/oracle/product/19.3.0/dbhome_1

export ORA_INVENTORY=/u01/app/oraInventory

export ORACLE_SID=<SID네임>

export TNS_ADMIN=/u01/app/oracle/product/19.3.0/dbhome_1/network/admin

PATH=$PATH:$HOME/.local/bin:$HOME/bin:$ORACLE_HOME/bin

export PATH

export LD_LIBRARY_PATH=$ORACLE_HOME/lib:/lib:/usr/lib

=================================================================

source .bash_profile
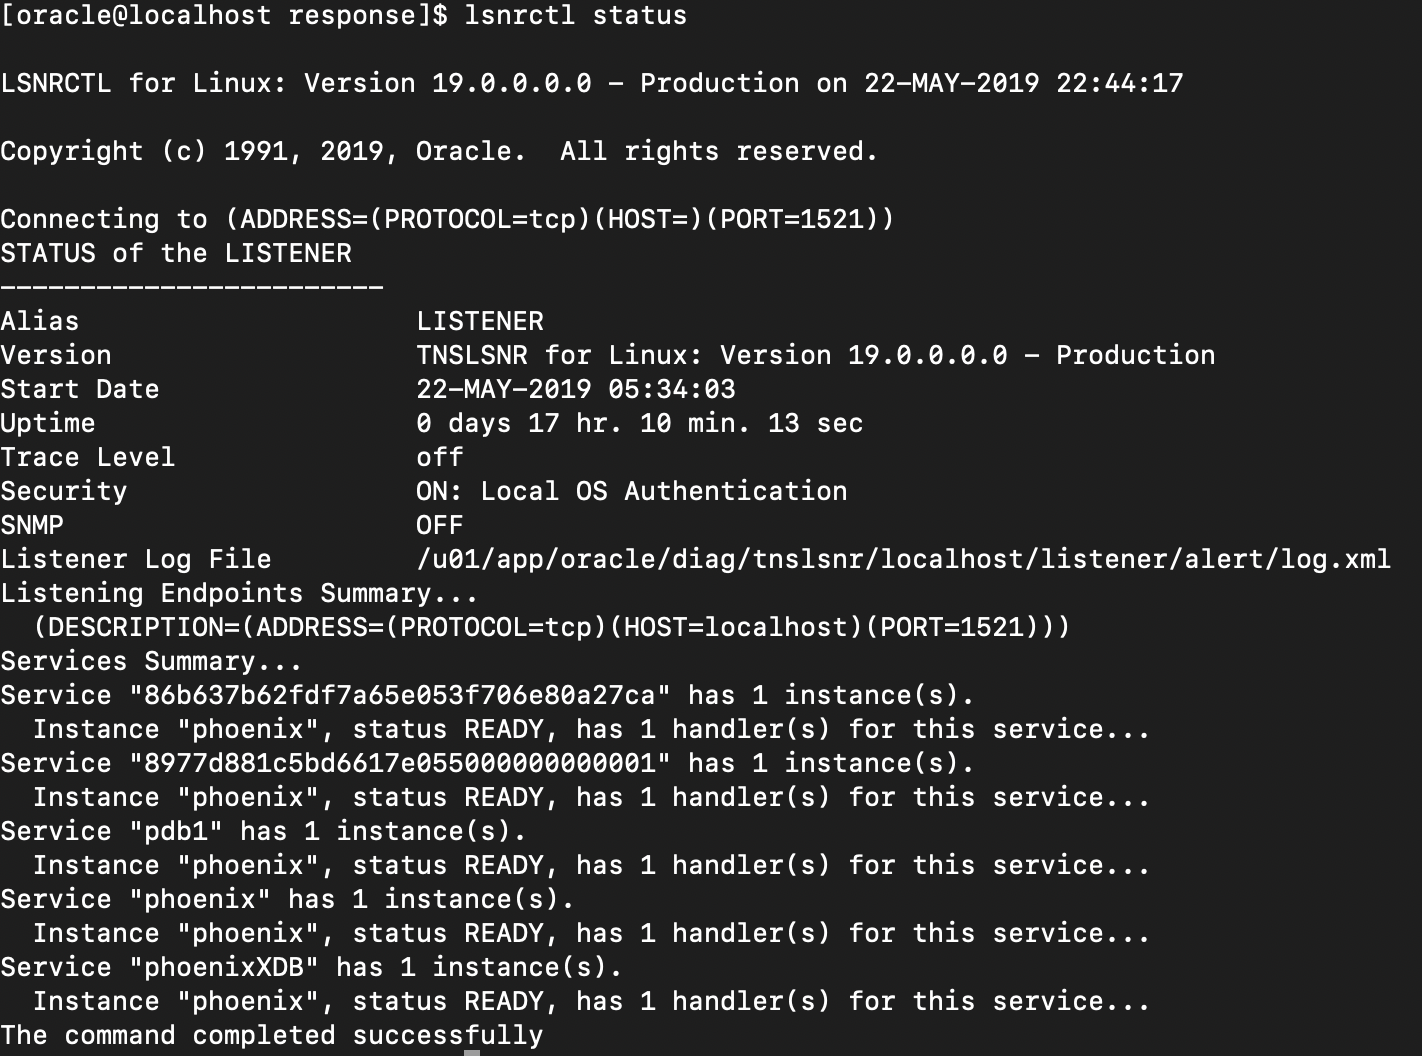
- lsnrctl 을 이용하여 리스너를 시작한다.
lsnrctl start
lsnrctl status 를 통해 현재 리스너 상태를 확인 할 수 있다.
4. DB Configuration
dbca(Database Configuration Agent)를 이용하여 설치된 Database 설정을 시작한다.
cd /u01/app/oracle/product/19.3.0/dbhome_1/assistants/dbca/
cp dbca.rsp dbca.rsp.bak
dbca.rsp 파일을 수정한다. 테스트이기 때문에 아래 두개만 수정해서 설정했다. sid는 위의 bash_profile에 있는 sid와 동일한 이름으로 설정해야 한다.
-
gdbName
-
sid
dbca -silent -createDatabase -templateName General_Purpose.dbc -responseFile /u01/app/oracle/product/19.3.0/dbhome_1/assistants/dbca/dbca.rsp
⇒ PDBADMIN User Password 를 입력해야 한다.
cd /u01/app/oracle/product/19.3.0/dbhome_1/network/admin
tnsnames.ora를 생성한다. 기본 형태는 아래와 같다.
서비스명 =
  (DESCRIPTION =
    (ADDRESS_LIST =
      (ADDRESS = (PROTOCOL = TCP)(HOST = 아이피)(PORT = 포트))
    )
    (CONNECT_DATA =
      (SERVER = DEDICATED)
      (SERVICE_NAME = 서비스명)
    )
  )
test =
  (DESCRIPTION =
    (ADDRESS = (PROTOCOL = TCP)(HOST = dbtest)(PORT = 1521))
    (CONNECT_DATA =
      (SID = test)
      (SERVER = DEDICATED)
      (SERVICE_NAME = test)
    )
  )
위와 같이 설정하고 아래 tnsping 으로 확인 할 수 있다.
tnsping test
=====================================================================================
TNS Ping Utility for Linux: Version 19.0.0.0.0 - Production on 22-MAY-2019 05:16:38
Copyright (c) 1997, 2019, Oracle. All rights reserved.
Used parameter files:
Used TNSNAMES adapter to resolve the alias
Attempting to contact (DESCRIPTION = (ADDRESS = (PROTOCOL = TCP)(HOST = 192.168.xxx.xxx)(PORT = 1521)) (CONNECT_DATA = (SID = test) (SERVER = DEDICATED) (SERVICE_NAME = test)))
OK (10 msec)
========================================================================
5. 테스트
sqlplus / as sysdba
SQL> show pdbs
CON_ID CON_NAME OPEN MODE RESTRICTED
---------- ------------------------------ ---------- ----------
2 PDB$SEED READ ONLY NO
3 PDB1 READ WRITE NO
6. ETC
만약 삭제후 다시 설치 하기 위해서는 아래 디렉토리에서 deinstall을 실행하면 된다.
/u01/app/oracle/product/19.3.0/dbhome_1/deinstall